Tie Dye Printable Instructions: A Comprehensive Guide
Dive into vibrant creativity! This guide offers easy-to-follow tie dye tutorials, from classic spirals to advanced shibori, perfect for all skill levels.
Explore trendy techniques like marbling and wig-wag patterns, alongside detailed instructions for achieving stunning rainbow effects on shirts and more!
Tie dye, a timeless textile art, has experienced a remarkable resurgence in popularity, captivating creators of all ages. What began as a resourceful method for embellishing fabrics has blossomed into a vibrant expression of individuality and style. This comprehensive guide aims to demystify the process, providing printable instructions and detailed tutorials to empower you on your tie dye journey.
From the iconic spiral patterns to intricate shibori techniques and the mesmerizing ombre effect, the possibilities are truly endless. Whether you’re reviving old garments or crafting unique fashion statements, tie dye offers a fulfilling and accessible creative outlet. We’ll explore various methods, including the classic rainbow spiral, the bold hyper jump design, and the captivating marbled look.
This isn’t just about following steps; it’s about understanding the principles behind color interaction and fabric preparation. Get ready to transform ordinary materials into extraordinary works of art!
What is Tie Dye and Its History?
Tie dye, at its core, is a resist dyeing technique – a method of folding, twisting, pleating, or crumpling fabric and binding it to create patterns before applying dye. The areas shielded by the bindings resist the dye, resulting in unique and often unpredictable designs. While often associated with the 1960s counterculture movement, its roots stretch far back in history.
Evidence of resist dyeing exists in cultures worldwide, including ancient China, Japan (where shibori techniques flourished), India, and Peru. These early forms often involved intricate hand-stitching and natural dyes derived from plants and minerals. The 1960s saw a revival in the West, becoming a symbol of individuality and self-expression.

Today, printable instructions and readily available dye kits have made tie dye accessible to everyone. It’s evolved from a niche craft to a mainstream fashion trend, continually reinventing itself with new techniques and vibrant color palettes.
Gathering Your Supplies
Embarking on your tie-dye journey requires a few essential supplies! First, you’ll need fabric – 100% cotton works best for vibrant color absorption. Tulip One-Step Tie-Dye Kits are a fantastic starting point, offering pre-mixed, ready-to-use dyes. Don’t forget protective gear: rubber gloves are crucial to prevent stained hands, and a drop cloth or plastic covering will safeguard your workspace.
Binding materials are key; rubber bands are traditional, but string or twine also work well. Squeeze bottles for dye application provide control, and plastic bags or plastic wrap are needed for setting the dye. A bucket or sink for rinsing is essential, and old towels will help manage any mess.
Finally, printable instructions (like this guide!) will streamline the process, ensuring a successful and colorful outcome. Having everything prepared beforehand makes the dyeing process smooth and enjoyable.

Essential Materials for Tie Dyeing
For a successful tie-dye experience, specific materials are non-negotiable. Tie-dye kits, like those from Tulip, provide a convenient all-in-one solution, including dyes, gloves, and sometimes even rubber bands. However, you can source items individually. Dyes themselves are paramount – reactive dyes are recommended for cotton, offering vibrant, long-lasting color.
100% cotton fabric is ideal, such as t-shirts, tote bags, or skirts. Rubber bands are crucial for creating patterns, while squeeze bottles allow for precise dye application. Plastic drop cloths protect surfaces, and plastic bags or wrap are needed for the dye-setting process.
Don’t overlook rubber gloves to shield your hands, and old towels for cleanup. Having these essentials readily available ensures a smooth and enjoyable creative process, allowing you to focus on the artistry of tie-dye!
Choosing the Right Fabric
Fabric selection is key to achieving vibrant and lasting tie-dye results. Natural fibers, particularly 100% cotton, are the most receptive to dye. This is because the dye molecules bond effectively with cotton fibers, creating a strong, wash-resistant color. Other natural fibers like linen and rayon also work well, though results may vary.
Avoid synthetic fabrics like polyester, as they don’t readily absorb dye. While some specialized dyes exist for synthetics, they often require higher temperatures and more complex processes. Pre-washing your fabric is crucial to remove any sizing or finishes that could hinder dye absorption.
White or light-colored fabrics provide the best canvas for showcasing the vibrant colors of tie-dye. Consider the weight of the fabric; lighter-weight fabrics are easier to manipulate and tie, while heavier fabrics offer a more substantial feel.
Preparing Your Workspace
Protecting your work area is paramount! Tie-dyeing can be messy, so cover your surfaces with plastic sheeting, old newspapers, or drop cloths. Work in a well-ventilated area, preferably outdoors, to avoid inhaling dye fumes. An easy-to-clean floor is also highly recommended – think garage, patio, or basement.
Gather all your supplies – dyes, bottles, rubber bands, gloves, fabric – and arrange them within easy reach. Have buckets of clean water readily available for rinsing. Wear old clothes that you don’t mind staining, and protect your hands with rubber or latex gloves.
Consider using a dedicated tie-dye station to contain the mess. Having everything organized beforehand will streamline the process and allow you to focus on the creative aspects of tie-dyeing!
Tie Dye Techniques: Step-by-Step
Unlock a world of patterns! Explore classic spiral, vibrant rainbow, bold bullseye, and unique wig-wag techniques. Detailed tutorials await your creative touch!
Classic Spiral Tie Dye
The iconic spiral is a fantastic starting point for any tie-dye enthusiast! Begin with a clean, damp cotton t-shirt. Pinch the fabric at the center point where you want the spiral to originate.
Twist and turn: Rotate the fabric continuously, creating a tight, flat spiral resembling a cinnamon roll. Secure this spiral firmly with rubber bands, dividing it into pie-shaped sections. The more rubber bands, the more defined your spiral will be.
Dye application is key: Carefully apply your chosen dye colors to each section, ensuring the dye penetrates the fabric. Consider using contrasting colors for a vibrant effect. Jacquard Products offers a clear tutorial emphasizing the importance of color placement for a true rainbow spiral.
Let the magic happen: Allow the dye to set for the recommended time (usually 6-8 hours, or overnight for deeper colors), then rinse thoroughly with cold water until the water runs clear.
Rainbow Spiral Tie Dye Instructions
Achieve a vibrant rainbow effect with this classic technique! Start with a pre-washed, damp cotton t-shirt. Pinch the fabric at the center and twist into a tight spiral, resembling a cinnamon roll. Secure with rubber bands, dividing the spiral into 6-8 sections – these will become your color zones.
Color placement is crucial: For a true rainbow, apply colors in the order of the spectrum – red, orange, yellow, green, blue, indigo, and violet. Ensure each color is applied to a separate section. Remember to apply the same colors to opposite sides of the spiral for a balanced result, avoiding a “rainbow spider pattern”.
Dye thoroughly: Saturate each section with dye, ensuring it penetrates the fabric. Allow the dye to set for 6-8 hours, or ideally overnight. Rinse with cold water until the water runs clear, then wash separately.
Bullseye Tie Dye Method
Create striking concentric circles with the bullseye technique! Lay your fabric flat and pinch a section you want to be the center of your bullseye. Pull the fabric upwards, creating a cone shape. Secure tightly with rubber bands at intervals down the cone – the closer the bands, the more defined the rings will be.

Apply dye strategically: Carefully apply different colors between each rubber band, ensuring each section receives ample dye. Consider using contrasting colors for a bolder effect. You can repeat this process to create multiple bullseyes across the fabric.
Allow for saturation and rinsing: Let the dye set for the recommended time (usually 6-8 hours). Rinse thoroughly with cold water, removing all excess dye, before washing separately in cold water. This method yields a visually dynamic and captivating pattern!
Stripes Tie Dye Tutorial
Achieve classic linear designs with this simple technique! Begin by folding your garment accordion-style, like creating pleats. The tighter the folds, the finer the stripes will be. Once folded neatly, secure the entire length with rubber bands spaced evenly apart – typically every inch or two.
Dye application is key: Apply different dye colors along the exposed sections between the rubber bands. You can opt for a rainbow effect, alternating colors, or stick to a limited palette for a more subtle look. Ensure the dye penetrates the fabric thoroughly.
Patience and rinsing are vital: Allow the dye to set for the recommended duration, usually 6-8 hours, for optimal color vibrancy. Rinse under cold water until the water runs clear, then wash separately to prevent color bleeding. Enjoy your bold, striped creation!
Marbled Tie Dye Technique
Create a unique, flowing pattern with the marbled tie-dye method! Start with a fully gathered fabric – scrunch it up randomly, rather than folding it neatly. Secure the entire bundle tightly with numerous rubber bands in various directions. This creates a dense network of creases and folds.
Dye application is crucial for the marbled effect: Generously apply dye all over the scrunched fabric, using multiple colors for a vibrant result; Don’t be afraid to layer colors and let them blend organically. The more dye used, the more pronounced the marbling will be.
Allow ample setting time: Let the dye sit for at least 6-8 hours, or even overnight, for maximum color absorption. Rinse thoroughly with cold water, removing all excess dye, and then wash separately. The result is a beautifully unpredictable, marbled masterpiece!
Wig-Wag Tie Dye Pattern

The Wig-Wag technique creates a dynamic, zig-zag pattern! Begin by pinching the fabric at one point and twisting it tightly, forming a long, cylindrical shape. Then, pleat the twisted fabric back and forth like an accordion, creating sharp folds. Secure these pleats firmly with rubber bands spaced evenly along the length.
Dye application defines the Wig-Wag: Apply different colors between each rubber band, ensuring each section receives a generous amount of dye. This creates distinct color blocks that will form the zig-zag pattern. Consider using contrasting colors for a bolder effect.
Patience is key for vibrant results: Allow the dye to set for the recommended time, typically 6-8 hours. Rinse thoroughly with cold water until the water runs clear, then wash separately. The final result is a striking, energetic Wig-Wag design!
Dyeing Process: Detailed Instructions
Apply dye evenly to each section, ensuring saturation for vibrant colors. Mix colors creatively, and allow sufficient setting time before rinsing thoroughly with cold water.
Applying the Dye
Carefully apply the chosen dye to your prepared fabric, ensuring complete saturation for the most impactful results. For a rainbow spiral, meticulously match colors on opposite sides – red to red, blue to blue – to achieve the classic swirling effect.
Utilize squeeze bottles for precise dye placement, especially when working with intricate patterns like bullseyes or wig-wag designs. Don’t be afraid to experiment with layering colors, but remember that overlapping can create unique blended shades.
Consider the fabric; some materials absorb dye more readily than others. Work in a well-ventilated area and wear gloves to protect your skin. Apply dye liberally, but avoid excessive pooling, which can lead to uneven coloring. Remember, a consistent application is key to a beautiful, professional-looking tie-dye project!
Color Combinations and Mixing
Unleash your creativity with vibrant color palettes! Classic rainbow combinations – red, orange, yellow, green, blue, and violet – remain popular, but don’t hesitate to explore unique blends. Consider complementary colors like blue and orange, or purple and yellow, for striking contrast.
When mixing dyes, start with small amounts and gradually add more to achieve your desired shade. Keep detailed notes of your mixtures for future reference. Remember that dye colors can appear different on fabric than in the bottle, so testing is crucial.
For subtle variations, experiment with adding white dye to lighten colors or black dye to create deeper tones. Avoid mixing too many colors together, as this can result in a muddy or unpredictable outcome. Plan your color scheme beforehand to ensure a harmonious and visually appealing final product!
Ensuring Even Dye Distribution
Achieving consistent color is key to a beautiful tie-dye result. After applying dye, gently massage it into the fabric, ensuring it penetrates all layers of the folds. Use a squeeze bottle for precise application, targeting each section thoroughly.
Flip the garment over and repeat the dye application on the opposite side, mirroring the colors used on the first side. This prevents unevenness and ensures a vibrant, symmetrical pattern. Avoid over-saturating the fabric, as this can cause colors to bleed and blend excessively.
For intricate patterns, use a brush to carefully apply dye to smaller areas. Check for any dry spots and add dye as needed. Remember, even distribution leads to a professional-looking finish, maximizing the impact of your chosen design!
Dye Setting and Rinsing
Allow the dye to set for a minimum of 6-8 hours, or ideally, 24 hours. This crucial step ensures the color bonds with the fabric fibers. Keep the dyed item in a sealed plastic bag or container during this process to maintain moisture and prevent drying.
Begin rinsing under cold water, gradually increasing the water pressure. Continue rinsing until the water runs clear – this removes excess dye. Avoid using hot water, as it can cause colors to fade or bleed. Wear gloves during rinsing to prevent staining your hands.

Wash the tie-dyed garment separately in cold water with a mild detergent for the first few washes. This further secures the dye and minimizes color transfer. Dry on a low heat setting or hang to dry, preserving the vibrancy of your creation!
Advanced Tie Dye Patterns
Elevate your skills! Explore intricate designs like Hyper Jump, traditional Shibori, captivating Ice Dyeing, and gradient Ombre effects for unique results.
Hyper Jump Tie Dye
Unleash a dynamic burst of color with the Hyper Jump tie dye technique! This pattern creates a striking, almost three-dimensional effect, resembling radiating energy. Begin by pinching the center of your fabric and twisting it into a tight, flat spiral, similar to a classic spiral tie dye.

However, instead of binding the entire spiral, strategically section it off with rubber bands, creating distinct ‘jumps’ or segments. Apply different colors to each section, ensuring vibrant contrast. The key is to use bold, complementary hues for maximum impact.
Allow the dye to set fully before rinsing. The resulting pattern is a visually exciting explosion of color, perfect for those seeking a more complex and modern tie dye design. Experiment with color placement to achieve unique variations of this captivating technique!
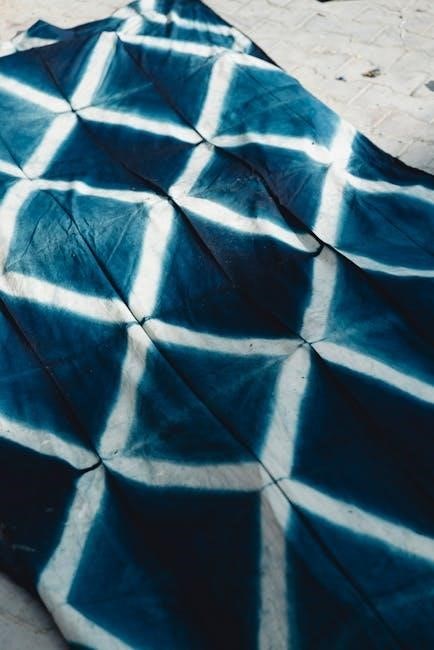
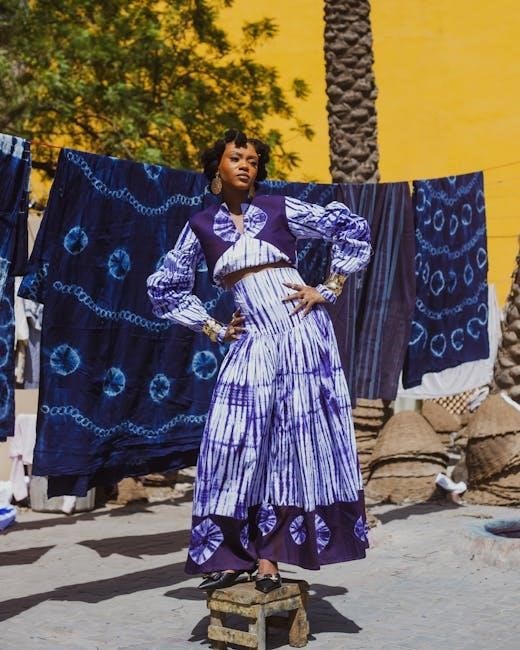
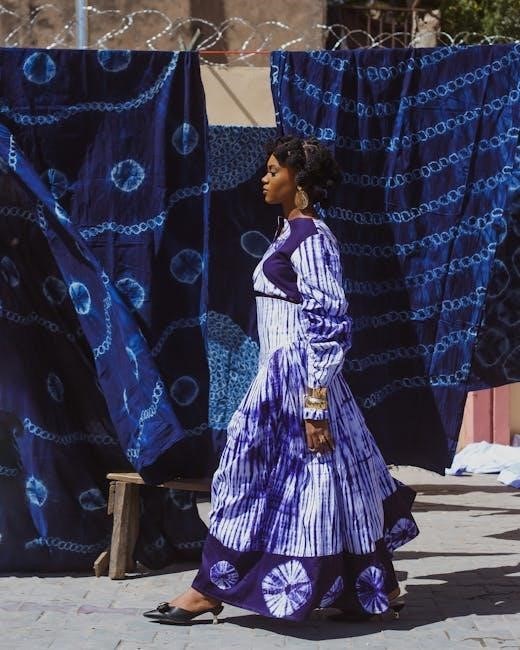
Shibori Tie Dye Techniques
Explore the ancient Japanese art of Shibori! Unlike typical tie dye, Shibori focuses on precise folding, twisting, and clamping techniques to create intricate, patterned resists. Several methods exist, including Kanjii (tie-resist), Itajime (shape-resist using boards), and Arashi (pole-wrapping).
Kanjii involves binding sections of fabric with thread, creating small, detailed patterns. Itajime utilizes wooden blocks to block dye penetration, resulting in geometric designs. Arashi, arguably the most dramatic, involves wrapping fabric tightly around a pole and binding it, producing dynamic, linear patterns.
Shibori often employs indigo dye, but modern variations embrace a wider color palette. Achieving authentic Shibori requires patience and precision, but the results – beautifully textured and uniquely patterned fabrics – are well worth the effort.
Ice Dyeing Method
Unleash unpredictable beauty with Ice Dyeing! This captivating technique replaces traditional dye application with… ice! Crumpled fabric is layered with powdered dye, then covered completely in ice. As the ice melts, it creates unique, watercolor-like patterns. The dye is distributed organically, resulting in soft, blended colors and stunning variations.
The key is the ice itself – it acts as both a resist and a delivery system for the dye. Different ice crystal sizes and melting rates contribute to the final design. Experiment with dye placement and fabric scrunching for diverse effects.
Pro Tip: Use a plastic bin to contain the melting ice and dye. This method is incredibly forgiving and yields beautiful, one-of-a-kind results, even for beginners. It’s a fantastic way to explore color blending and create artistic textiles!
Ombre Tie Dye Effect
Create a gradient masterpiece with the Ombre Tie Dye effect! This technique achieves a beautiful transition of color, fading from dark to light (or vice versa) across your fabric. Unlike traditional tie dye, ombre focuses on a gradual color shift rather than distinct patterns.
The secret lies in controlled dye application. Start by applying the darkest shade of dye to one section of the fabric, then gradually reduce the dye concentration as you move towards the opposite end. You can achieve this by diluting the dye with water or using progressively lighter shades.
Experiment with different color combinations for striking results. Pro Tip: For a seamless blend, lightly mist water onto the fabric between dye applications. This helps the colors meld together, creating a smooth ombre transition. It’s a sophisticated take on tie dye!
Post-Dyeing Care & Maintenance
Preserve your vibrant creations! Proper washing prevents color bleeding and ensures long-lasting brilliance. Cold water and color-safe detergents are essential for tie dye garments.
Washing Tie Dye Garments
Initial Wash: After rinsing out the dye, it’s crucial to wash your tie-dye garment separately for the first few washes. This prevents any excess dye from transferring onto other clothes. Use cold water – hot water can cause colors to fade and bleed. A mild, color-safe detergent is your best friend; avoid harsh chemicals or bleach.
Subsequent Washes: Once the initial dye release has subsided (usually after 2-3 washes), you can begin washing your tie-dye items with similar colors. However, continuing to use cold water is highly recommended to maintain vibrancy. Turn the garment inside out before washing to protect the design from abrasion during the wash cycle.
Drying: Air drying is the gentlest option and will help preserve the colors for longer. If you must use a dryer, select a low heat setting. High heat can cause shrinkage and fading. Remember, a little extra care during washing will ensure your tie-dye creations remain bright and beautiful for years to come!
Preventing Color Bleeding
Color Fixatives: To minimize color bleeding, consider using a color fixative after rinsing the dye. These products help lock the dye into the fabric fibers, reducing the amount that releases during washing. Follow the product instructions carefully for optimal results.
Vinegar Soak: A simple home remedy involves soaking the dyed garment in a solution of cold water and white vinegar (about a cup of vinegar per gallon of water) for 30 minutes before the first wash. This helps set the dye and reduce bleeding.
Separate Washing: As mentioned previously, always wash new tie-dye items separately for the first few washes. Even with fixatives, some dye release is normal. Cold water is essential, and avoid washing with light-colored items until you’re confident the bleeding has stopped. Regular use of color-catching sheets in the wash can also help!
Long-Term Care Tips
Gentle Washing: To preserve the vibrancy of your tie-dye creations, always wash them inside out in cold water. Harsh detergents can fade the colors, so opt for a mild, color-safe detergent. Avoid bleach at all costs, as it will quickly diminish the dye.
Low Heat Drying: Tumble dry on low heat or, even better, hang your tie-dye garments to dry. High heat can cause the colors to fade and the fabric to shrink. Air drying also helps maintain the softness of the material.
Minimize Sun Exposure: Prolonged exposure to direct sunlight can also cause colors to fade over time. When drying outdoors, try to hang your tie-dye items in a shaded area. Proper care will ensure your vibrant designs last for years to come!
Troubleshooting Common Issues
Color Bleeding: If you experience color bleeding, especially during the first few washes, re-wash the garment alone with cold water and a color-catching sheet. Pre-soaking in a salt water solution before dyeing can help minimize this.
Muddy Colors: Muddy or dull colors often result from insufficient dye saturation or improper rinsing. Ensure thorough dye application and rinse until the water runs completely clear. Avoid over-mixing dyes, as this can also lead to undesirable shades.
Uneven Dyeing: For uneven dye distribution, ensure the fabric is properly scrunched or tied, and the dye is applied evenly throughout. Using a spray bottle can help reach all areas. Remember, slight variations are part of the tie-dye charm!